One major goal for the LDDC is to assist other student attorneys in the greater clinic “firm” in gaining a deeper appreciation for how various legal information systems work and interact with each other. LDDC students look for ways to innovate our practice – and the practice of other UB law clinics – using Clio.
Please find below an introduction to the basic functionality of Clio and its various features. Although it is possible (and suggested) to download Clio as an app on your phone, the instructions below assume you are using the Clio website.
CLIO CASE MANAGEMENT SYSTEM
Clio is an online cloud-based case management system (CMS). Clio is used to record and document just about all aspects of case and project management – communications, contacts, activities, calendar events, etc. Beyond this, Clio can be used to save all work product – Microsoft Word documents, PDFs, Excel and CSV (“Comma-Separated Value”) files, and so on. Finally, Clio can also be used to record your clinic time and to keep track of your To Do Lists.
A. Dashboard, Search Box, and Main Menu
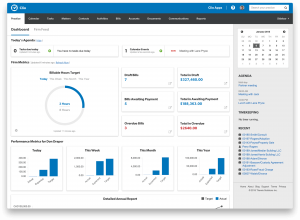
The “front page” for Clio, the page that opens when you first log in, is known as the Dashboard. At the very top left of the Dashboard page, you will see a Search Box. On the left hand-side of the Dashboard page, you will see the Main Menu. The options for the Main Menu are “Dashboard” (at the top), “Calendar” (below), all the way down to “Help Center” (at the bottom). No matter where you navigate to on the Clio site, you will always be able to see and use the Search Box and Main Menu.
The most useful part of the Dashboard page is near the top – the “Today’s Agenda” heading. This features summaries of “Tasks Due Today” and “Calendar Events” for the day. The clinic does not really use the “Hourly Metrics” or “Billing Metrics” parts of the Dashboard – these are really designed for private law firms where billing is critical and at the front of everybody’s minds.
The Search Box is very powerful and is a very useful way to quickly locate Matters and Contacts. Often it us quicker to use Search rather than navigate via the Main Menu.
B. Matters and Documents
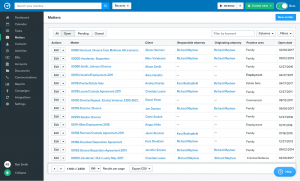
The basic organizational unit for Clio is the Matter. Generally speaking, every client/project will have its own Matter. All Matters have a number, client name, and description.
There are different ways that you can access Matters. One way is to click on the “Matters” option in the Main Menu. This will take you to a page where all of the open matters for all the UB law clinics are listed. To look only at open Matters in your clinic, you can use the “Filters” option near the top left of the screen. If you click on “Filters”, scroll down to “Practice area” and select your clinic, you will see all of your clinic’s active clients/projects.
Alternatively, you can find a matter using the Search Box. Just type in keywords from the client’s name of the Matter’s description.
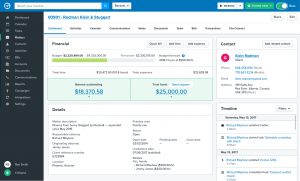
Once you click into a matter, you will see the number and client name at the top of the screen with the matter’s description right below it. Below that, you see the Matter Menu, which displays horizontally across the screen. The left-most option on the Matter Menu is “Dashboard”; to the right of that are “Custom Fields,” “Activities,” “Calendar” and so forth all the way across to “Clio Connect.” You will often be using the Matter Menu to access specific information about that Matter, especially that Matter’s Documents.
All work product for your clients and for your project work can be saved under the Documents tab for that matter. As an alternative to the clinic’s R drive, Clio’s document system is cloud-based and easily accessible when you are not on campus. At the same time, Clio’s document system works just like the R drive – you can create file folders and you upload and download files to Clio documents just as you would to the R drive.
See how to upload and download documents here.
Client/Project Matters v. Student Matter
There are two basic types of Matters. The first type is what you might think of as the “standard” – the Matters for clients and projects. As much as possible, a student attorney should make sure that the files and file structure for the Documents for each client/project are kept organized and up to date.
The second basic type of Matter is a Student Matter. This is the Matter you will use when you are recording your time that is not associated with a particular client or project.
Most commonly, you will associate the time you spend in seminar, supervision meetings, and preparing/studying for seminar and supervision meetings with this Administrative Work file.
For more information on matters, click here.
C. Contacts
Clio uses Contacts as its mechanism to store information about “People” and “Companies.” It is your responsibility to make sure that all of your client/project Matters has complete contact information associated with it.
To see whether a person/company is already in the Clio system, use the Search Box or use the Contact item off the Main Menu.
- If a person/company is in Clio but has incomplete or inaccurate information, you must first click onto the contact’s name. This will open up the client contact page. You must then click the “Edit Contact” button on the top right of the screen. After editing, be sure to click Save!
- If your searches reveal that a person/company is not yet in Clio, you can add them in different ways. One way is to click Contacts in the Main Menu bar and then click either “New Person” or “New Company” in the top right of the You will find other ways to create contacts from within Matters that are self- explanatory.
- Whenever possible, try to associate People with Companies. You can do this by either editing the Person and associating the Company using the Company box, or by editing the Company and using the “Add Employee.”
For a video on creating and managing contacts, click here.
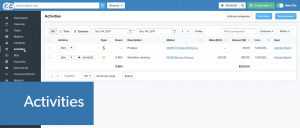
D. Activities
Clio’s Activities functions are how you record your time. These time entries are subsequently used to generate your Weekly Time Reports (WTR). Tracking your time is a big part of what lawyers do – especially in private practice. Although we do not bill our clients (all of our work is pro bono and in the public interest), you should recognize that learning to track your time regularly and effectively will be very useful if and when you become a practicing lawyer.
As with most of Clio’s functionality, there are many different ways for you to enter Activities. Here are two:
- Go to the page for the Matter that you have been working on. Click the “Activities” tab on the Matter Menu. Then click the “New time entry” button on the top right of the screen. This will open a box where you can fill out the duration, category, date, and description of the Activity.
- Go directly to the Activities option in the Main Menu. Click “New time entry.” This will open a box where you can fill out the duration, category, and description of the Activity. Though Clio does not demand it, it is best practice to always associate an Activity with a Matter. If you don’t know what matter to choose, your default should be the Student Matter.
In terms of content for the time entries themselves, we first suggest the following:
- For Duration, round out to the nearest 15 minutes (i.e., 1hr 15m, 45min rather than 1hr 12m or 43m). While some private firms require their lawyers to track time in 6-minute increments, that is unnecessary in our practice.
- For Description, be concise but provide sufficient detail for the context. For example, a 2hr entry reading “Reading for seminar” would be fine in your Admin Work file. However, a 2hr entry reading “Research” in a client/project file would not be sufficient. Instead something like “Researched question regarding CSV files. Found three useful websites. These are recorded in Notes” would be much better.
See how to track your time efficiently here.
E. Tasks
Clio’s Task functions are how you can assign and track “To Dos” for client/project Matters. Tasks are used to generate your weekly TDL reports. Tasks are an extremely useful tool for project management – it provides a convenient mechanism to set deadlines and monitor progress.
To see the Tasks currently assigned to you, click the Tasks option on the Main Menu. This will display all the Tasks you have across all Matters. Using the menu at the top of the screen, you can also look at the To Dos you have completed by clicking “Completed.”
To see all the Tasks for a given Matter, go to the Matter and then click the “Tasks” tab on the Matter Menu. This will show all the Tasks assigned to all the members of the team working on that Matter.
As with Activities, you can add new Tasks from the Main Menu or from the “Tasks” tab within a given Matter. The green “Add” button is on top right of either screen. When you add a Task, you must give the Task a name and Due Date. You can assign tasks to other people or to yourself under the Assignee field. You should add a Description if the Task’s name is not completely obvious or if further context is needed.
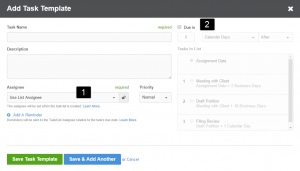
Click here for how to create a task.
Once you have completed a Task, you can “cross it off” by going to your Task list (either via the Main Menu or via the Matter Menu), check the box to the left of the now-completed Task, and then click the “Mark as Complete” option just under the Task text.
Finally, you may sometimes want to edit a Task – to change the Due date, assignee, or description. You can do this by clicking the “Edit” option under the Task text. Be mindful about editing tasks. Sometimes it is better to have a Task marked as “Overdue” to remind you to do it. In addition, you must consult your supervisor before editing a Task that has been assigned to you by that supervisor.
F. Calendar
Clio also has a Calendar to facilitate scheduling, accessible via the Main Menu. The Clio Calendar should look familiar to you as it functions similarly to other popular calendaring apps like Google, Exchange, or iCal.
When you click on the Calendar page, note the “My calendars” and “Other calendars” options on the right-hand side. Under “Other calendars”, make sure that you have the “calendar for your clinic checked.
If you use Google or another calendaring app to keep track of your own schedule (and we hope that you do!), we strongly suggest that you integrate Clio with that app. Clio has help pages that explain the ways to integrate including using a calendar feed or syncing calendars.
Note that calendar feeds and calendar syncs are both options available via the “More” button near the top right of the Calendar page.
As with other Tasks or Activities, you can create new events either via the mainCalendar page or via the “Calendar” tab off the Matter Menu. And as with Tasks or Activities, it is best practice to associate Calendar events with specific Matters. To create the event, just click the “New event” button on the top left of the calendar page you are on. In the “New event” page, make sure you specify which calendar to save it to using the “Save to this calendar” box.
For an illustration of the calendar function, click here.
G. Communications/Email Drop
The final Clio function that you should initially familiarize with is Communications. This is where you record phone calls and emails. Although you can access Communications via the Main Menu, it is recommended that you normally access this option via the Matter Menu. This is in order to ensure that any communication recorded is associated with a Matter.
The primary use of the Commination tab is to get the “Maildrop address” for a Matter.
This maildrop address is a special email address. When an email is sent to the maildrop address, it appears in the Communication tab for that matter AND any attachments to that email are automatically saved in the “Email attachments” folder for that Matter. These are extremely useful functions.
You should use this maildrop address in two situations. First, when you are sending an email related to a matter (i.e., an email to a client or to a related party), put the maildrop address in the BCC line. Using BCC ensures that emails recipients do not see a potentially confusing address. Second, if you receive an email that pertains to a matter, forward that email directly to the maildrop address. Once again, this will ensure that the email as well as any attachments become part of the file.
In addition to email, the Communication tab allows you to record the content of phone calls. To do this, simply click the “New phone log” button. Filling out the form is fairly intuitive. However, it is worth noting that this log works best if the person you are speaking with is in the Clio contacts database.
I. How to Create a Weekly Time Report (WTR):
Your time is recorded as Activities in Clio for all Matters. To generate an Activities report:
- From the Dashboard, select Activities from the left navigation
- On top row of the Activities screen, enter Start and End Dates of your WTR. (Start and End boxes are between the “$Expense” and “Custom” boxes).
- Click the Export button at the bottom of
- Choose PDF or CSV option, depending on what your supervisor
- Choose Save. Naming convention for files should be ‘YourLastName_WTR_WeekX’, where X is Week 1, Week 2, etc.
II. How to Create a To Do List (TDL) Reports:
Your “To Dos” are recorded as Tasks in Clio for all Matters. You will need to generate reports for both Upcoming TDLs and Completed TDLs. The process is the same.
- From the Dashboard, select Tasks from the left navigation
- On top row of the Tasks screen, click either Upcoming or Completed depending on which report you are
- Click the Export button at the top right of screen (next to green Add button).
- Select “Export All”. Choose PDF or CSV “Output Format” option, depending on what your supervisor
- Click “Create Export”. When ready, you must click “Download” and give your file a Naming convention for files should be ‘YourLastName_Upcoming_TDL_WeekX’ or ‘YourLastName_Completed_TDL_WeekX’, where X is Week 1, Week 2, etc.